01. INTRODUCTION
The Life Tributes™ Personalized Printing Materials (1) option within the Project Options portion of General Info page, illustrated below, lets you easily click and print a number of customizable printed material options. The PRINTING (2) icon at the top of the screen is the jumping off point to these functions.
This document describes the personalized printing materials available.
02. HOW DOES IT WORKS
Creating personalized printed materials using Life Tributes™ is quick and easy. No matter what selection you make from the Printed Materials menu, the screens all look the same and you can simply click PRINT NOW to generate the printed material. The elements that make up each screen are described below.
1. The Let’s look at portion of the screen lets you work with the Outside or the Inside of the printed material you’re working with.
2. The What would you like on this Side? portion of the screen allows you to select the elements you would like to appear on that side and edit them if
you want to.
3. The CHANGE THEME button allows you to change the Theme currently in place.
4. The Preview pane allows you to view how that element will look when printed out.
5. Snap mode snaps all of the elements in place. You can move elements to wherever you’d like by deselecting the Snap mode checkbox.
6. There are two unique layouts available. Simply select one from the Layout drop-down menu to see how it looks and select the one you like best.
7. The PREVIEW button allows you to preview how your printed material is going to look before printing, if you want to check.
8. The PRINT NOW button instantly creates your printed material.
ALIGNMENT WIZARD
The first time you attempt to print any of your Life Tributes™ Memorial Video materials, the system recognizes this fact and automatically launches the Alignment Wizard. This wizard determines your printer’s settings to ensure that your materials print correctly.
Note: If you want to use a different printer than the one currently selected to print your materials, you can make a different selection once you click OK on this screen.
Follow the steps below to start the Alignment Wizard.
- Select the Do not show this message again checkbox if you do not want to see this screen again when printing.
- Click OK to launch the wizard.
ADJUSTING PRINTER ALIGNMENT
Clicking ALIGNMENT on the Print dialog box displays the Adjust Print Alignment dialog box, illustrated below, which allows Life Tributes™ to configure your printer’s alignment settings by printing a test page.
Note: It is highly recommended that you use standard 8 ½ x 11 paper for printing test pages.
Follow the steps below to continue with the Alignment Wizard.
- To select a different printer to configure, select it from the Choose your printer drop-down menu.
- Click NEXT to continue the alignment process.
- Click CANCEL to exit this screen without properly aligning your printer.
PRINTING AN ALIGNMENT TEST PAGE
Once you have clicked NEXT on the previous screen the following Adjust Print Alignment dialog box is displayed. This dialog box is used to allow Life Tributes™ to analyze your current printer settings to ensure proper printing of your memorial video materials. Follow these steps to successfully print a test page.
Note: The PRINT ANOTHER TEST and RESET functions are used following successful generation of your first test page.
- Click PREV to return to the previous dialog box, if necessary.
- Click FINISH to generate the test page. An example test page is shown on the following page.
- Click CANCEL to exit this dialog box without generating the test page.
SAMPLE TEST PAGE
The illustration below represents a sample test page. Simply fold the page in half, horizontally and then vertically, making note of where the horizontal and vertical folds are running through on the horizontal and vertical grids, and then enter the values for each in theSet Alignment portion of the previous dialog box.
03. PERSONALIZED PRINTED MATERIALS MENU
Clicking the PRINTING icon on the Life Tributes™ Home page displays the Personalized Printing Materials menu at-the left-hand-side of the screen, as shown in the illustration below. This menu1provides the following options, which are described throughout the course of this document:
- Memorial Folder
- Bookmark
- Thank You Card
- Memorial Cards
- Remembrance Cards
- Prayer Cards
04. MEMORIAL FOLDER
Selecting Memorial Folder from the Print Item menu displays the Memorial Folder screen, as shown in the following illustration. Options are available for both the outside and inside of the Memorial Folder within the Let’s look at portion of the screen. You can use your mouse to move or resize images within the Preview pane. Follow the steps below to work with the Memorial Folder screen.
FOR THE OUTSIDE
Within the "What would you like on this side menu":
- Click the Obituary, Funeral Home Name, Birth and Death Date, Designer Text or Cover Photo checkbox to include them in the Memorial Folder.
Note: Clicking Edit for an item on the menu or deselecting and then reselecting any of the checkboxes displays a series of pop-ups windows for editing purposes. Please refer to the Editing Functions portion of this document for details.
FOR THE INSIDE
The following illustration is displayed when Inside is clicked within the Let’s look at portion of the screen.
Within the "What would you like on this side menu":
- Click the Stylized Poem, Right Image, Center Image or Left image checkbox to include a stylized poem and/or align the image within the Memorial Folder.
- Click PRINT NOW to print out the Memorial Folder.
05. BOOKMARK
Selecting Bookmark from the Personalized Printing menu displays the Bookmark screen, as displayed in the following illustration. Follow the steps below to work with the Bookmark screen.
FOR THE OUTSIDE
Within the "What would you like on this side menu":
- Click the Funeral Home Name, Obituary, Birth and Death Date, Designer Text or Cover Photo checkbox to include them in the Memorial Folder.
Note: Clicking Edit for an item on the menu or deselecting and then reselecting any of the checkboxes displays a series of pop-ups windows for editing purposes. Please refer to the Editing Functions portion of this document for details.
FOR THE INSIDE
The following illustration is displayed when Inside is clicked within the Let’s look at portion of the screen.
Within the What would you like on this side menu:
- Click the Funeral Home Name, Obituary, Birth and Death Date checkbox to include them on the Bookmark.
Note: Clicking Edit for an item on the menu or deselecting and then reselecting any of the checkboxes displays a series of pop-ups windows for editing purposes. Please refer to the Editing Functions portion of this document for details.
06. THANK YOU CARD
Selecting Thank You Card from the Personalized Printing menu displays the Thank You Card screen, as displayed in the following illustration. Follow the steps below to work with the Thank You Card screen.
FOR THE OUTSIDE
Within the What would you like on this side menu:
- Click the Obituary, Funeral Home Name, Birth and Death Date, Designer Text or either of the Cover Images checkboxes to include them in the Thank You Card.
Note: Clicking Edit for an item on the menu or deselecting and then reselecting any of the checkboxes displays a series of pop-ups windows for editing purposes. Please refer to the Editing Functions portion of this document for details.
- Click PRINT NOW to print out the Thank You Card.
FOR THE INSIDE
The following illustration is displayed when Inside is clicked within the Let’s look at portion of the screen.
Within the What would you like on this side menu:
- Click the Thank You Message checkbox to include a Thank You Message in the Thank You Card.
- Click OK and then click PRINT NOW to print out the Thank You Card.
07. MEMORIAL CARDS
Selecting Memorial Cards from the Personalized Printing menu displays the Memorial Card screen, as displayed in the following illustration. Follow the steps below to work with the Memorial Card screen.
FOR THE OUTSIDE
Within the What would you like on this side menu:
- Click the Funeral Home Name, Birth and Death Date, Designer Text or the Cover Image checkboxes to include them in the Memorial Card.
Note: Clicking Edit for an item on the menu or deselecting and then reselecting any of the checkboxes displays a series of pop-ups windows for editing purposes. Please refer to the Editing Functions portion of this document for details.
- Click PRINT NOW to print out the Memorial Card.
FOR THE INSIDE
The following screen is displayed when Inside is clicked within the Let’s look at portion of the screen.
Within the What would you like on this side menu:
- Select the Designer Text or Left Image checkbox to include them in the Memorial Card.
Note: Clicking Edit for an item on the menu or deselecting and then reselecting any of the checkboxes displays a series of pop-ups windows for editing purposes. Please refer to the Editing Functions portion of this document for details.
2. Click PRINT NOW to print out the Memorial Card.08. REMEMBRANCE CARDS
Selecting Remembrance Cards from the Personalized Printing menu displays the Remembrance Card screen, as displayed in the following illustration. Follow the steps below to work with the Remembrance Card screen.
FOR THE OUTSIDE
Within the What would you like on this side menu:
- Click the Obituary, Birth and Death Date, Designer Text or either of the Image checkboxes to include them in the Remembrance Card.
Note: Clicking Edit for an item on the menu or deselecting and then reselecting any of the checkboxes displays a series of pop-ups windows for editing purposes. Please refer to the Editing Functions portion of this document for details.
09. PRAYER CARDS
Selecting Prayer Cards from the Personalized Printing menu displays the Prayer Card screen, as displayed in the following illustration. Follow the steps below to work with the Prayer Card screen.
FOR THE OUTSIDE
Within the What would you like on this side menu:
- Click the Birth and Death Date, Designer Text or Image checkboxes to include them in the Prayer Card.
Note: Clicking Edit for an item on the menu or deselecting and then reselecting any of the checkboxes displays a series of pop-ups windows for editing purposes. Please refer to the Editing Functions portion of this document for details.
10. EDITING FUNCTIONS
As mentioned throughout this guide, there are editing functions available within each screen. The following pages offer a brief glimpse of what you’ll see if you click on an Edit link and how to work with each one.
OBITUARY
The Edit Text pop-up, illustrated below, works as any standard word processing program does, allowing you to edit and format the text currently serving as your obituary text.
FUNERAL HOME NAME
The Funeral Home Name pop-up, illustrated below, allows you to modify the current funeral home name and add the words “Produced By” and have them display above the funeral home name in the Memorial Folder.
BIRTH AND DEATH DATE
The Select Name pop-up, illustrated below, allows you to edit the birth and death dates for use with the Memorial Folder. Simply make your edits and click OK to save them.
DESIGNER TEXT
The Choose Stylized Text pop-up, illustrated below, allows you to choose from among a number of pre-populated designer text styles. Selecting one from the Stylized Text menu displays that choice in the Preview pane for your review. When you find a style to your liking, simply click OK to apply it to the Memorial Folder.
COVER PHOTO
The Choose Images pop-up, illustrated below, allows you to modify or change your cover photo for use in the Memorial Folder. The FROM FILE, FROM SCANNER and FROM TIMELINE options allow you to replace the current image with an image from each of those sources. The EDIT IMAGE option allows you to modify the current image.
ORDER OF SERVICE
Selecting Layout 2 from the Layout drop-down menu provides you with one additional option when creating your Memorial Folder: Order of Service. This information can be displayed in two different ways: Centered (the default) and Two columns, shown in the second illustration below.
Edits are made here by highlighting the text and making your revisions. You can also change the color of the text using the Color drop-down menu.
CHANGE THEME
Click CHANGE THEME to replace the current theme with another. The Change Theme pop-up is displayed with the current theme highlighted. Simply make another selection on the Theme menu and click CHANGE to change the theme for the Memorial Folder.
- Click PREVIEW to display the Print Preview screen, as shown in the following illustration. Use the Zoom drop-down menu to change the size at which the screen is displayed, if necessary. Click CHANGE SIDE to view a preview of the other side from the one on which you are working. This link will change to CHANGE TO INSIDE or CHANGE TO OUTSIDE once it has been used, depending on which side you are working on.
11. ADDITIONAL FUNCTIONALITY
RIGHT-CLICK FUNCTIONALITY
Right-clicking within the Preview pane on any of the Life Tributes™ screens provides you with additional editing functionality.
Right-clicking within the Preview pane with none of the elements within it selected displays a pop-up menu from which you can choose additional functions to work with, as shown in the following illustration:
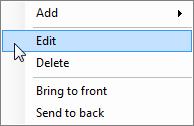
Right-clicking within the Preview pane with an element within it selected displays a pop-up menu from which you can choose additional editing functions to work with, as shown in the following illustration
Note: Right-clicking to the right of line on the What would you like on this side list deselects that item’s checkbox.
ZOOM IN/ZOOM OUT
Clicking the left or right arrows within the Preview pane, shown in the illustration below, acts as a zoom in and zoom out function, to be used when necessary for a better view of the pane.